In a nutshell
- 🧽 Use a baking soda paste (3:1 powder to water), give it a two-minute dwell, then wipe and buff for instantly whiter grout with minimal effort.
- ⚗️ It works because it’s mildly alkaline (lifts greasy soils) and offers gentle abrasion without scratching tiles, making it kinder than bleach and low-odour.
- 🧪 For stubborn marks, swap water for 3% hydrogen peroxide and extend dwell to 5 minutes; never mix with bleach and take care on natural stone.
- 🧱 Technique matters: patch-test old or unsealed grout, apply neatly with a toothbrush or finger, wipe with a damp microfibre, then reseal grout to lock in brightness.
- 💷 Budget- and planet-friendly: it’s inexpensive, low-waste, and safe with light ventilation and gloves, with simple mix ratios that deliver consistent results.
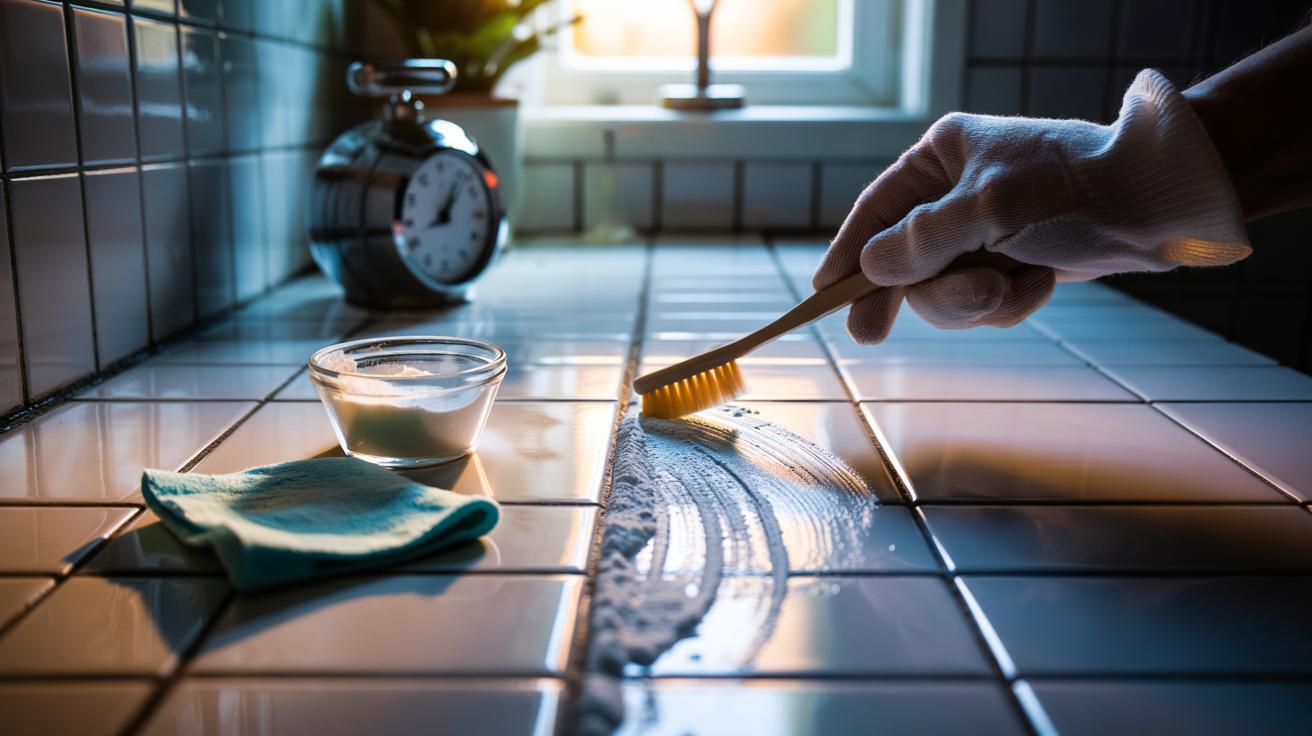
Tile grout turns dingy quietly. One day your bathroom sparkles; the next it looks tired. The good news? You don’t need harsh chemicals or a weekend’s worth of elbow grease. A humble cupboard staple — baking soda — can lift embedded grime and restore a crisp, clean line in minutes. This fast method works because the powder acts as a gentle abrasive while its alkaline nature loosens oily residues and mildew stains. Mix, spread, wait, wipe. That’s it. In two minutes of dwell time you can see a visible colour reset, a simple intervention that resets the room’s whole look without fumes, scrubbing marathons, or expensive kits.
Why Baking Soda Works on Grout
Grout is porous. It guzzles moisture, soaps, and microscopic dirt, then oxidises at the surface to look grey or yellow. Baking soda (sodium bicarbonate) is mildly alkaline, which helps break the bond between greasy soils and the mineral matrix of grout. It’s also a fine, soft powder. That gives it a micro-sanding effect without scratching glazed tiles. This twin action — chemical lift plus gentle abrasion — is what makes the paste so effective so quickly.
Unlike chlorine bleaches, bicarbonate does not strip the grout’s binder or create sharp odours. It’s kinder to lungs and sealants, a big win in small UK bathrooms with limited ventilation. It buffers acids left by shampoos and hard water, which can etch or discolour cementitious grout over time. And because it’s dry-stored and inert, it stays potent in your cupboard for months. When activated with a trickle of water, it forms a spreadable paste that clings to vertical lines, targeting grime exactly where it sits. The result: cleaner lines, brighter tiles, fewer harsh products under the sink.
Two-Minute Method: Mix, Apply, Wipe
Here’s the quick routine journalists love because it just works. In a small dish, combine 3 parts baking soda with 1 part water. Stir until you have a thick, yoghurt-like paste. If it’s runny, add a pinch more powder; if too stiff, add drops of water. You want adhesion, not drips. Use a fingertip in a glove, a small spatula, or a soft toothbrush to glide the paste along the grout lines. Keep it neat. No need to flood the tiles.
Set a timer. Let the paste sit for two minutes to loosen soils. For light discolouration, that’s enough. Then wipe with a damp microfibre cloth in smooth passes, lifting away the paste and the now-mobilised grime. Rinse the cloth and repeat until residues are gone. For a little extra pop, buff dry with a second towel. If your grout is very old or unsealed, do a discreet test patch first; some historic grouts shed more grime and may need an extra minute or a second pass. Still quick. Still low effort. And yes — the line looks whiter.
Tackling Stubborn Stains and Different Surfaces
Not all stains are equal. Tea-coloured hard-water marks, mould shadows, or makeup pigments can be stubborn. Step one stays the same: the baking soda paste. If a patch remains dull after the first wipe, reapply and extend the dwell to 5 minutes. For organic stains, upgrade the liquid to 3% hydrogen peroxide instead of water; it adds a mild oxidising lift without bleach’s bite. Use the same ratio — 3:1 powder to liquid — and the same gentle passes.
Tile types matter. Glazed ceramic and most porcelains are friendly. Natural stone — marble, limestone, travertine — demands caution. Bicarbonate is mild, but stone can be surprisingly soft, and pigment-laden pastes may lodge in open pores. Always patch-test and wipe promptly. Never mix baking soda with bleach; the reaction creates unwanted by-products and can degrade grout. For silicone sealant edges, stick to a lighter touch and avoid vigorous brushing that can roughen the surface. Good news: most soap-scum haze yields quickly to the alkaline paste, especially if you wipe with warm water and a taut microfibre cloth that traps loosened film rather than pushing it around.
Costs, Safety, and Eco Credentials
There’s a reason this hack is in every cleaner’s toolkit: it’s inexpensive, low-waste, and gentle on indoor air. A standard 500 g box of baking soda costs less than a coffee, and a routine bathroom refresh uses a few tablespoons. No solvents, no phosphates, no aggressive scents. For families, renters, or anyone with pets, that matters. The safety brief is straightforward: avoid eyes, wear light gloves if you have sensitive skin, and ensure basic ventilation. Rinse cloths thoroughly so no fine powder dries chalky on tiles.
To help you plan, here’s a quick reference guide for mixes and use-cases.
| Paste Mix | Dwell Time | Best For | Avoid On |
|---|---|---|---|
| 3:1 baking soda:water | 2 minutes | Routine brightening, light soap scum | None (patch-test old grout) |
| 3:1 baking soda:3% hydrogen peroxide | 2–5 minutes | Organic stains, mild mildew shadows | Unsealed natural stone; always test |
| Thicker paste (4:1) | Up to 5 minutes | Vertical lines, heavy grime spots | Crumbly or cracked grout |
If in doubt, shorter dwell and gentler wiping win. You can repeat a quick cycle far more safely than forcing a single, aggressive scrub. For sealed grout, finish with a clean-water wipe to prevent residue lines. For unsealed grout, consider resealing once dry; it keeps that hard-won brightness longer and means the two-minute trick works even faster next time.
In the end, the beauty of this method is its simplicity. No special tools. No sour fumes. Just baking soda, water, and two calm minutes that flip a room from dull to crisp. It’s the kind of small home habit that pays back every week, particularly in busy UK bathrooms and high-traffic kitchens where grout lines age fast. Ready to try it on one square metre, timer in hand, and see how much brightness you can reclaim in the time it takes for the kettle to boil — or will you tweak the mix and report which ratio works best on your tiles?
Did you like it?4.4/5 (21)